- Edit or Create a New Form.
-
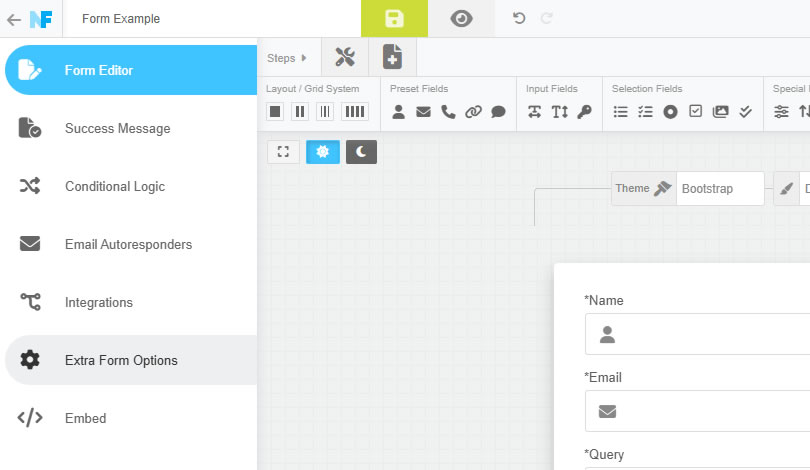
Click on the "Extra Form Options" item from the left hand menu.

-
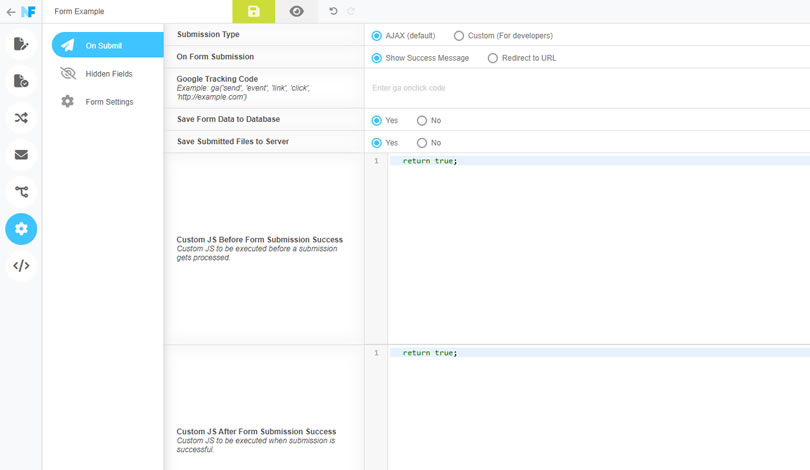
Click on "On Submit".
-
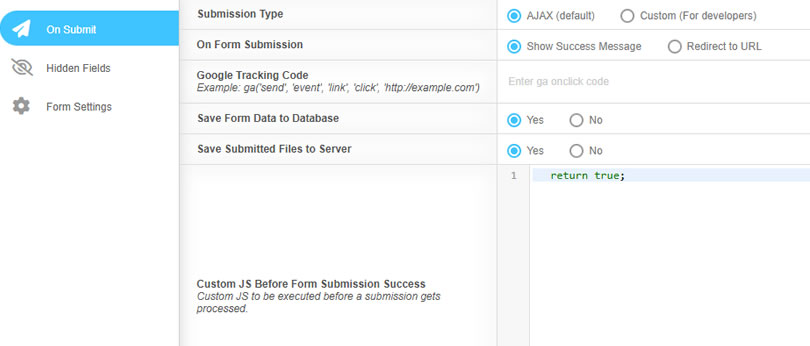
Set the "Submission Type" setting to "AJAX".
-
Set the "On Form Submission" setting to "Show Success Message".
NEX-Forms Documentation
Documentation & Tutorials for NEX-Forms version 8.0 and above
On Form Submission Options
This article will guide you on setting up options when a form gets submitted.
In this Article
- Showing the Success Message on Form Submission
- Redirecting to a URL on Form Submission
- Posting Directly to a Custom Page, Script or 3rd party System
- Adding a Google Coverstion Tracking Code
- Enable/Disable Data Saving to your Database
- Enable/Disable File Uploads to your Server
- Adding Custom Javascript
Showing the Success Message on Form Submission
This option will show the success massage created for the form as per: Success Message Setup & Styling
Redirecting to a URL on Form Submission
Use this option to redirect to a custom Thank you Page after the form gets submitted.
- Edit or Create a New Form.
-
Click on the "Extra Form Options" item from the left hand menu.
-
Click on "On Submit".
-
Set the "Submission Type" setting to "AJAX".
-
Set the "On Form Submission" setting to "Redirect to URL".

-
Enter the URL to where the form needs to rediret to after the form have been submitted.
Posting Directly to a Custom Page, Script or 3rd party System (For Developers Only)
Use this option to bypass the default NEX-Forms data handling and emailing and send the form data direclty to your own custom script or 3rd party system like a CRM.
- Edit or Create a New Form.
-
Click on the "Extra Form Options" item from the left hand menu.
-
Click on "On Submit".
-
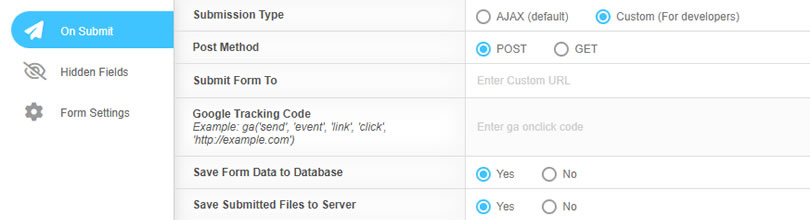
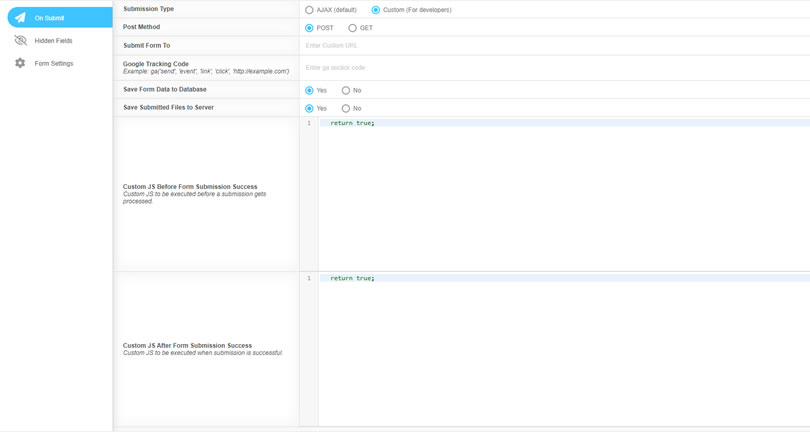
Set the "Submission Type" setting to "Custom (For Developers)".
-
Set the your prefered post method to POST or GET.
-
Enter the URL to where the form needs to be submitted to.
Adding a Google Coverstion Tracking Code
- Edit or Create a New Form.
-
Click on the "Extra Form Options" item from the left hand menu.
-
Click on "On Submit".
-
Past your Google Converstion Code. Example: ga('send', 'event', 'link', 'click', 'http://example.com')
Enable/Disable Data Saving to your Database
- Edit or Create a New Form.
-
Click on the "Extra Form Options" item from the left hand menu.
-
Click on "On Submit".
-
ENABLE saving the form data to the NEX-Forms WP Datebase by chaging the setting to "Yes". (Default)
DISABLE saving the form data to the NEX-Forms WP Datebase by chaging the setting to "No".
Enable/Disable File Uploads to your Server
This option is only applicable when using File Uploader fields in your form.
- Edit or Create a New Form.
-
Click on the "Extra Form Options" item from the left hand menu.
-
Click on "On Submit".
-
ENABLE saving submitted files to your server by chaging the setting to "Yes". (Default)
DISABLE saving submitted files to your server by chaging the setting to "No".
Adding Custom Javascript (For Developers Only)
Add your own custom javascript to be executed before a successful form submission are or/and after.
- Edit or Create a New Form.
-
Click on the "Extra Form Options" item from the left hand menu.
-
Click on "On Submit".
-
Add javscript to be executed BEFORE a successful form submission in the "Custom JS Before Form Submission Success" editor box. Make sure to return true or false.
Add javscript to be executed AFTER a successful form submission in the "Custom JS After Form Submission Success" editor box. Make sure to return true or false.
Was this article helpful?
Still having trouble? How can we help you?
This article was last updated on 19 November 2024
Popular Articles
Stay in Touch
Get the latest NEX-Forms news and info by following us on:
In this article


premier_ct recently bought a NEX-Forms - PLUS Plan

fitahbaz recently bought a NEX-Forms - BASIC Plan

Gili Mor recently bought a NEX-Forms - BASIC Plan

Websites for a Song recently bought a NEX-Forms - BASIC Plan

Ana Paula Meyer recently bought a NEX-Forms - PLUS Plan